Introduction
IP blacklisting can happen both to your own public IP and also your server (VPS). Indicators that show your public IP is blacklisted as a user, are pretty obvious, like you will get 403 or access denied error and website will tell you that “you have done something that triggered our firewall, therefore we block you, maybe for now or forever”, most of the time it’s temporary.
But when your server’s IP (which may host your website) gets blacklisted, how would you know? And it’s not always a website’s host, sometimes you buy a VPS to run an automation for example, but you send too many requests to an API or a website from that VPS, so they decide that you are a potential attacker and they block IP of the VPS. Nowadays CDNs handle most of this job. Some signals that show possible IP blockage are:
If your emails suddenly stop reaching customers, your website forms fail to deliver notifications, or your server traffic gets blocked unexpectedly, there’s a strong possibility that your IP address has been blacklisted.
IP blacklists are widely used by email providers, spam filtering systems, hosting companies, Web Application Firewalls (WAFs), and cybersecurity platforms to identify suspicious IP addresses associated with spam, malware, phishing, or abusive behavior. Once an IP lands on a blacklist, it can seriously affect email deliverability, business communications, and even website reputation.
For IT managers, system administrators, and business owners, understanding how IP blacklists work is essential for maintaining healthy infrastructure and uninterrupted communication.
In this guide, you’ll learn:
- What an IP blacklist is
- Why IP addresses get blacklisted
- How to check if your IP is blacklisted
- The most common blacklist providers
- Step-by-step IP removal methods
- Best practices to prevent future blacklist issues
If you suspect email delivery problems or reputation damage, this guide will help you diagnose and resolve the issue quickly.
What Is an IP Blacklist?
An IP blacklist is a real-time database of IP addresses that have been identified as sources of spam, malicious activity, malware distribution, phishing campaigns, or suspicious network behavior. So basically everyone can see what IPs are blacklisted. Even when your building a platform, that information can come in handy since some of those IPs, maybe a good number of them, are associated with bot nets, brute forcing servers, malware hosting platforms, spammers and so on. In most cases, we as users, programmers, business owners, don’t use these databases directly. Instead we use providers to protect us.
These databases are commonly used by:
- Email providers
- Spam filters
- Firewalls
- Web hosting companies
- Enterprise security gateways
- Internet service providers
When a receiving mail server checks an incoming email, it often compares the sender’s IP address against multiple blacklist databases. If the IP appears on one or more lists, the email may be:
- Rejected entirely
- Marked as spam
- Delayed
- Quarantined
Some blacklists focus specifically on email spam, while others monitor broader malicious activity such as botnets, open proxies, brute-force attacks, or malware hosting.
Common Types of IP Blacklists
There are several categories of blacklist systems that work based on IP, because some blacklisting systems work on the application layer and use HTTP Headers or cookies for instance.
1. Email Spam Blacklists
These are the most common and widely used lists.
Examples include:
- Spamhaus
- Barracuda
- SpamCop
- SURBL
- Invaluement
Their primary purpose is to block spam email traffic.
2. Malware & Threat Intelligence Lists
These monitor IPs associated with:
- Malware distribution
- Command-and-control servers
- Phishing attacks
- Botnet activity
Security vendors and firewalls often use these feeds.
3. DNS-Based Blacklists (DNSBL)
DNSBL systems allow mail servers to query blacklist databases using DNS lookups in real time.
This enables rapid filtering before accepting incoming messages.
4. Reputation-Based Systems
Modern providers like Microsoft and Google also maintain internal reputation systems that may not be publicly visible. These are custom built systems and each company has their own reasons and methodologies to apply.
An IP may have poor reputation even if it does not appear on public blacklists.
Why Do IP Addresses Get Blacklisted?
Understanding the root cause is critical before attempting removal.
Sending Spam Emails
The most common cause is large volumes of unsolicited or low-quality email.
This may happen because of:
- Poor mailing practices
- Purchased email lists
- Compromised accounts
- Marketing automation abuse
Malware Infection
If a server becomes infected with malware, attackers may use it to:
- Send spam
- Launch attacks
- Host phishing pages
- Operate botnet activity
Security vendors quickly flag such behavior. It’s always a good practice to do a quick security check in such events.
Misconfigured Email Servers
Improper mail server configuration can trigger spam detection.
Common examples include:
- Missing SPF records
- Missing DKIM signatures
- Incorrect PTR/reverse DNS
- Open mail relay configurations
You can also read our detailed guide on Reverse DNS configuration and troubleshooting.
Shared Hosting Reputation
On shared hosting environments, another user’s behavior may impact your IP reputation.
This is common with low-cost hosting providers where many customers share the same outbound mail IP. When you buy a shared VPS, you have your own environment, that’s true, but so does someone else on the same server, so you both use the same IP.
High Complaint Rates
If recipients frequently:
- Mark emails as spam
- Ignore messages
- Unsubscribe aggressively
email providers may reduce your sender reputation over time.
Signs Your IP May Be Blacklisted
You may notice several symptoms before discovering the actual blacklist issue. Before we dig in, there is always an easy way. You can do the exact same network related actions on your website, server’s shell and your personal PC then compare the result. This simple triangle often tells you what’s wrong.
For example, you are using a third-party API on your website that has suddenly stopped working, in fact, it’s not responding to your website. First thing you can do is that run a simple curl command in server’s terminal as follows:
Curl –I https://some-api.com
If you get a legitimate OK HTTP response, then your server is probably fine, problem is your application code base or a module you used in the code or whatever. This was just to show you that debugging can be so easy at times.
Emails Going to Spam
One of the earliest indicators is a sudden drop in inbox placement.
SMTP Error Messages
Mail servers may return messages such as:
- “554 IP blacklisted”
- “Rejected due to spam”
- “Blocked using Spamhaus”
- “Connection refused”
Low Email Deliverability
Transactional emails like:
- Password resets
- Order confirmations
- Contact form notifications
may fail to arrive.
Website or Server Access Restrictions
Certain security services may block access from suspicious IP ranges and not only single IPs.
How to Check if Your IP Is Blacklisted
Checking blacklist status is relatively straightforward if you know where to look.
Step 1: Find Your Public IP Address
First, identify the IP address used by your server or mail system.
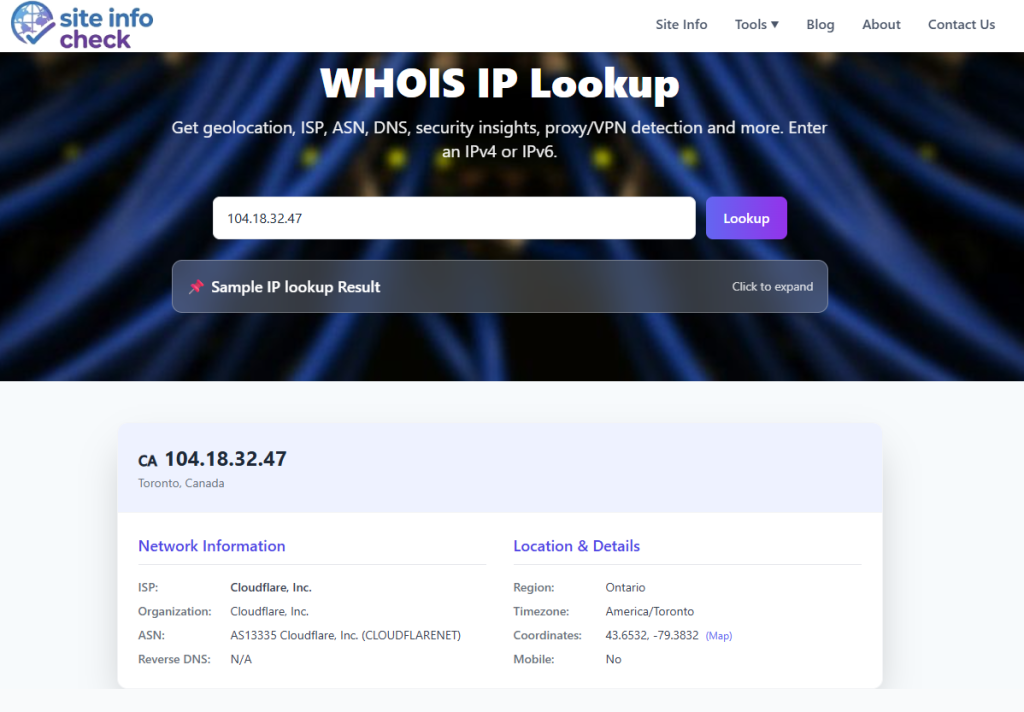
For websites and servers, you can use the Site Info WHOIS IP Tool to discover:
- IP ownership
- ASN details
- Hosting provider
- Geolocation
- Network reputation indicators
Step 2: Use IP Blacklist Lookup Tools
Get the IP and check it against multiple blacklist databases. Several public tools aggregate blacklist databases and scan your IP across multiple providers.
A proper blacklist lookup checks:
- Spam databases
- DNSBL records
- Email reputation systems
- Threat intelligence feeds
Common blacklist providers include:
- Spamhaus
- BarracudaCentral
- AbuseIPDB
- MXToolbox
- SpamCop
These systems help determine whether your IP is flagged and why.
Step 3: Review Mail Server Logs
For mail administrators, logs provide valuable evidence.
Look for:
- SMTP rejection codes
- Bounce messages
- Spam complaints
- Connection blocks
Common mail server log locations (These may have been customized in your server but there are most common paths):
Postfix
/var/log/mail.log
Exim
/var/log/exim_mainlog
Microsoft Exchange
Use Message Tracking Logs and Queue Viewer.
Step 4: Check Reverse DNS & Email Authentication
Improper DNS configuration often contributes to blacklisting. Like a misconfigured PTR record, no reverse DNS records at all (ISP hostname) which makes your server look like a residential IP which is used for spamming, DNS resolving to a blacklisted domain.
Some more factors to verify:
- SPF (Sender Policy Framework) records: It lists IPs that are allowed to send email for your domain.
- DKIM (Domain Keys Identified Mail) signatures: through DNS public key, it adds a digital signature.
- DMARC (Domain-based Message Authentication, reporting and Conformance) policies: Tells receivers what to do when SPF/DKIM fail. A broken DMARC, causes legit emails to fail.
- Reverse DNS (PTR records): If PTR record mismatches A record (forward DNS), it raises a red flag and cause IP blacklist.
Major IP Blacklist Providers Explained
Spamhaus
Spamhaus is one of the most influential spam blocklists globally.
Many enterprise email systems rely heavily on Spamhaus data.
Their lists include:
- SBL (Spamhaus Block List): it’s mostly used for confirmed spam sources.
- XBL (Exploits Block List): A list of IPs infected by malwares, bot nets or open proxies. It’s mainly used to identify compromised machines that send spam without owner’s knowledge
- PBL (Policy Block List): IP ranges that should not send mails directly and it’s used to enforce outbound mail policy.
Being listed here can severely impact deliverability.
Barracuda Reputation Block List
Widely used by corporate email security appliances.
Barracuda focuses heavily on spam behavior patterns and sender reputation. Despite Spamhaus, it has one single combined list of IPs and also provides shorter dwell times because it will remove IPs automatically within hours or a few days after spam stops. On the other hand Spamhaus SBL often requires manual removal requests.
SpamCop
SpamCop relies significantly on spam complaints submitted by users and it’s not a traditional curated list. They simply add IP to the blacklist if it gets reported by multiple users. Frequent complaints can trigger rapid listings.
AbuseIPDB
Focused more on malicious activity reporting than traditional email spam. Mainly used by security professionals because it can show a wide range of IP abuse such as some web attacks, SSH brute force and DOS or DDOS. Not our topic, but it’s also used to find subdomains of a domain.
Useful for identifying compromised servers and attack sources.
How to Remove Your IP from a Blacklist
Removal requires fixing the underlying issue first.
Attempting delisting without resolving the root cause often leads to immediate relisting.
Step 1: Identify the Cause
Determine why the IP was listed.
Possible causes include:
- Spam campaigns
- Compromised CMS plugins
- Weak passwords
- Malware infections
- Open relays
- Vulnerable scripts
Conduct a full server audit if necessary. Easier methods are also available, one was mentioned, here is the next one. You can use a terminal tool like dig. Let’s say your IP is 111.222.33.44 and you want to check it against Spamhaus ZEN list, you can do as follows (at the time of writing this blog, this method works):
dig +short 111.222.33.44.zen.spamhaus.org
If you get no output, then IP is not listed. Also you can get the reason by requesting TXT record:
dig +short TXT 111.222.33.44.zen.spamhaus.org
This usually returns a URL dedicated to your IP that if you open in your browser, it will tell you exactly why you have been blocked.
Step 2: Secure the Server
Recommended actions:
- Update all software
- Change passwords
- Enable MFA
- Scan for malware
- Close unused ports
- Disable open relays
- Patch vulnerabilities
For WordPress websites, review plugins and themes carefully and also never install third-parties from untrusted sources.
Step 3: Improve Email Authentication
Ensure proper email authentication is configured.
Minimum recommendations:
- SPF
- DKIM
- DMARC
- Valid reverse DNS
These help establish sender legitimacy.
Step 4: Reduce Spam Signals
Improve email practices:
- Clean mailing lists
- Remove inactive users
- Avoid purchased lists
- Limit bulk sending
- Warm up new IPs gradually
Step 5: Request Delisting
Most blacklist providers offer removal forms.
Some removals are automatic after clean behavior for a period of time.
Others require manual review.
You may need to provide:
- Your IP address
- Explanation of the issue
- Remediation steps taken
- Contact information
How Long Does Delisting Take?
It depends on the blacklist provider. For a database like Spamhaus SBL, even your ISP may need to request removal.
Typical timeframes:
| Provider Type | Typical Delisting Time |
| Automatic temporary lists | Few hours to 48 hours |
| Manual review systems | 1–7 days |
| Severe abuse cases | Several weeks |
Persistent abuse history may lead to repeated relisting. Make sure IP doesn’t go back there after delisting.
Best Practices to Prevent Future Blacklisting
Prevention is significantly easier than remediation.
Monitor IP Reputation Regularly
Regular reputation monitoring helps detect issues early. It can be done using several methods like a dedicated monitoring service, self-hosted scripts and also network analysis tools.
Businesses sending transactional or marketing emails should monitor:
- Bounce rates
- Complaint rates
- Blacklist appearances
- Delivery statistics
Implement Strong Security Policies
A secure application prevents much of this problems. Key protections include:
- Firewalls
- Endpoint security
- Intrusion detection
- Access control policies
- Rate limiting
Configure DNS Correctly
DNS hygiene is critical.
Misconfigured DNS remains one of the most overlooked causes of email delivery problems.
Use Dedicated IPs for Email
Dedicated outbound email IPs provide better control over sender reputation.
Shared IP pools introduce external risks.
Follow Responsible Email Practices
Avoid spam-like behavior:
- Excessive promotional messaging
- Misleading subject lines
- Poor list hygiene
- Sudden sending spikes
Public vs Private Blacklists
Not all blacklists are publicly searchable.
Public Blacklists
Examples:
- Spamhaus
- SpamCop
- Barracuda
These offer public lookup systems.
Private Reputation Systems
Large providers maintain proprietary reputation models.
Examples include:
- Google Gmail reputation systems
- Microsoft SmartScreen
- Yahoo internal filters
You may experience spam filtering without appearing on public lists.
The Role of IP Reputation in Cybersecurity
IP reputation is now a major component of modern cybersecurity systems.
Security platforms continuously evaluate:
- Sending behavior
- Traffic patterns: Even changing an HTTP header like user-agent which is a browser indicator frequently can trigger a monitoring system
- Abuse reports
- DNS integrity
- Malware indicators
Poor reputation can affect:
- Email delivery
- API communication
- Web traffic
- VPN access
- Cloud services
Maintaining a clean IP reputation is therefore both an operational and security priority.
Final Thoughts
IP blacklisting can disrupt email communication, damage business credibility, and create operational headaches for IT teams.
The good news is that most blacklist issues are solvable once the root cause is identified.
By combining:
- Proper server security
- Responsible email practices
- DNS hygiene
- Reputation monitoring
you can significantly reduce the risk of future blacklisting.
Whether you’re managing a corporate mail server, a website hosting environment, or transactional email infrastructure, regular IP reputation monitoring should be part of your ongoing security strategy.
If you suspect deliverability issues or spam-related problems, don’t wait until customers stop receiving emails.
Check your IP reputation and blacklist status now.
Frequently Asked Questions
Can a website IP be blacklisted even if it does not send email?
Yes. IPs may be blacklisted for malware hosting, phishing, botnet activity, or suspicious traffic patterns even without email activity.
Does changing hosting providers fix blacklist problems?
Sometimes. However, if the root cause remains unresolved, the new IP may also become blacklisted.
How can I improve my IP reputation?
Improve server security, authenticate email properly, avoid spam practices, and maintain healthy mailing lists.
Are all blacklists equally important?
No. Some lists have minimal impact, while others like Spamhaus significantly influence global email delivery.
How often should businesses check IP reputation?
Organizations sending important emails should monitor IP reputation continuously or at least weekly.
Leave a Reply